
I decided to add a heater to the enclosed trailer. My garage has no heater and no insulation so I was always having to travel to my buddy’s heated shop on his farm to work on my sleds.
I wanted to show my installation and provide a great deal of information to help others if they decide to do it.
I sometimes use my enclosed trailer for camping, so it was a plus to add a heater. I don’t hunt, but if I did, I would camp out in there in late fall!
It’s great for mobile repairs.
This is the first season I had this heater and it worked awesomely! I love it. Unfortunately, I had a crank bearing go out in my sled, so that really came in handy when working in negative temperatures outside.
I would recommend insulating your trailer first for the best propane usage and power consumption. Mine is uninsulated, but I have the white interior panels all the way around and the ceiling.
I currently have used 45% of my 15.4-gallon tank and on estimated 80 hours of a heater on(not running constantly though). I find that really good!
I found my heater and propane tank on Craigslist, took a while, but a great deal.
My total build investment is around:
$381 – Heater, propane tank, propane lines, anything heater install related
$220 – Electrical Install – That price also includes my 120VAC install with the duplex also. For someone doing the cheaper router, you could just add a battery and isolator relay to power.
I included my supplies list and source information.
[link no longer valid]
Everything might be considered overkill, but I love it. It new man cave as well too. The heater has come in handy.
There was a lot of talk on Heating in the Truck and Trailer thread but figured to start a new thread.
lg96gt and gerard143 and others have had good information posted there as well.
ENJOY!
Heater
I decided to go with a 30K BTU RV/camper forced air heater.
I didn’t want a catalytic heater. I also didn’t like the smell of Mr. Heaters. Those heaters also add moisture.
The RV forced air furnaces are the safest and the only way to go for heaters in a trailer. You can safely store gas cans inside and clean carbs and not worry about fire.
I mostly use the heater for repair jobs inside the trailer. My requirement was at least 30K BTU. I found a used Duo-Therm - 65930-064 30K BTU. I really wanted a Suburban or Atwood for its size, but got this for $125 locally. I’ve seen used Suburbans go for around $200-$500. I might upgrade later, but the heater kicks the heat out! Atwood and Suburban make great RV-forced air heaters.
My Duo Therm measures:
Width: 15 1/2"
Height: 14 1/4"
Length: 23"
Propane Tank Options
I had to figure out a Propane solution. I didn’t have room for an outside tank mounted in front of the V like campers are set up. My jack was in the way. I didn’t want to keep it inside just for safety reasons. I have seen people do it before but decided against it. I wanted to do a permanent mount propane tank mounted underneath the trailer in between the axles. I kept my eye open for an ASME Horizontal Permanent Mount RV propane tank.
The ASME tanks are different than the DOT (non-permanent) Horizontal Mount tanks and are more expensive. The DOT(non-permanent) Horizontal Mount in service uses a horizontal mount, but when you need to fill it, it needs to be vertical. The DOT regulation tanks cannot be mounted underneath the trailer. Only the ASME tank would fit my needs.
The Permanent ASME tanks have a Relief Valve, Vapor Service Valve, Outage Valve (Fixed Liquid Level Gauge), and 80% Stop-Fill Valve. I kept my eye out for one on Craigslist. After a while of searching, I found one for $50. I had to drive 1 ½ hrs to get it, but worth it. The tank was a 15.4-gallon tank, so plenty big. These tanks are hard to find I learned. I think my other option would be #3, mount it in the V of the trailer and enclose it in a box and vent outside.
I listed propane mounting options for others to use.
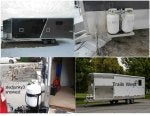
1. ASME Horizontal Permanent Mount RV propane tank
- Mounted underneath trailer in-between axles
- 15.4 Gallon tank – 3x capacity of a normal 5-gallon bbq tank
- This setup and safety were questioned by 1 person on the Trucks and Trailers thread. Here was the info I gathered. I should have an extra diamond plate for more protection. My tank did come with a rock shield by the propane connections already.
"I talked to 6 different guys on SnoWest about the installation. That's where I got the idea. SnoWest guys have been running that setup for years like that without any issues. People also use this same propane tank on old-school VW Westy vans. It must be ASME rated though.
I like your idea of the diamond plate as a shield. Extra protection. Good thinking!"
"We all like to attempt to plan for the worst case scenario like rollovers or slide-offs. I tried a little extra protection when I mounted it behind the axle. At least if I hit something hard, the front axle should sustain the hit. That is head-on and not sideways though. With the other propane mounting options, there is still a chance of it getting damaged in an accident as well. Maybe not as much as my setup, but still a chance."
"But the shield is a good idea because if your regulator vent hole (pretty tiny) gets iced over, the reg will not work."
Other people’s ideas
![Image]()
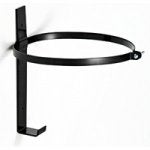
2. Vertical Mount Outside in front of V of trailer
Must purchase bracket
Trailer jack might be in the way
Other people's ideas - Exterior V Mounting Tank Pic
![Image]()
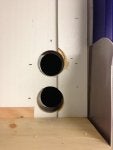
3. Vertical Mount or Horizontal Mount in a trailer in an enclosed box with outside vents
-Must build propane mount and enclosed box with outside air vents
The propane Tank should not be exposed to the inside heating area. It should be sealed in an enclosed box and vented to the outside.
“I see some of you guys putting tanks inside...my math on this one was pretty easy on why NOT to do it. making a mount, and running an extra 20ft of copper cost me around $40. mounting it inside, possibly dying if I sleep overnight in the trailer, or a possible time bomb if for some reason escaped gas ignites cost me my life. ever seen a trailer filled with propane blow-up? there isn't a trailer anymore...(youtube) I'll take the $40 route. just my .02”
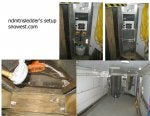
ndmtnsledder on Snowest had a great idea.
“I was able to figure out how to open up the front of the V inside and managed to squeeze a propane tank at the bottom and seal from the electric area, then a battery shelf, and above that an RV style charger converter that runs my 12v and 110v systems and a battery meter gauge”.
“I have very fine-meshed steel that the propane tank sits on but the mice can't get through and then I went around underneath all the wall cavities and sprayed an expandable foam that said it's mouse-proof. Since I've done that I have had a single sign of mice in the trailer.”
ndmtnsledder's(snowest) setup
![Image]()
Propane Tank Painting
I decided to repaint it before it was mounted. Wire brush and Rustoleum Clean Metals Primer & Paint. I Rubber band a plastic bag over the valve assemblies and paint away.
Before
[image no longer available]
After Wire Brush and sanding
[image no longer available]
Let the painting begin
[image no longer available]
[image no longer available]
Propane Tank Install
I mounted the propane tank underneath the trailer. It is located towards the back, behind the axles. I figured it was better protected behind the axle. The propane tank had mounted on it. I dropped carriage bolts from inside the trailer down. I put some big spacers on the bolt to keep the tank directly off the floor.
[image no longer available]
[image no longer available]
[image no longer available]
Propane Lines Install
The furnace requires a 11 w.c pressure. I picked up a 2 stage Propane Pressure Regulator and connected it to the propane tank. I used 3/8” soft copper for the short runs and ½” black iron pipe for the long runs. I used ½” steel clamps for fastening to the frame underneath. The best tubing to use is the Marine Grade Flexible LPG tubing.
See propane mounting pdf.
[image no longer available]
Heater Install
Electrical
I needed to have 8A DC available for the heater. You do not want to run this directly off your normal truck starting battery when the truck is off. You will need another battery or 120VAC power w/ 12DC transformer. I wanted 120VAC power outlets installed as well. To supply enough current and run this setup I had a couple of options. For the majority of the time, I will always be around a 120VAC outlet available(shore power). At my house, hotel parking lots, etc. I will eventually put in 2 – 6V golf cart batteries or just buy a generator for mobile locations where no power is available.
The shore power(house electric outlet to extension cord) is brought into a Marinco Marine On-Board Charger Inlet (15-Amp, 125-Volt). For the time being, I’m not running an air compressor so 15A is fine. When I do add it, I will replace the 15A Marinco inlet with a 30A hookup.
The shore power wiring then goes to a sub-panel breaker box with 3 breakers. The 3 duplex outlets are wired to the breakers for AC use.
I needed a +12VDC supply also for the heater and lights. I used a 400-watt (15A) computer power supply to power the DC loads(heater & lights, etc…) when 120VAC shore power is plugged in. The computer power supply was modified so it turns on with no load and added 8awg wires for the heavier currents. I will eventually go with a PD 9245C 45 Amp RV Converter/Charger to replace the computer power supply if I add batteries to the trailer. The computer supply was a cheap solution for the time. I added a relay so the trailer receives +12VDC from the truck when it is hooked up to the truck, but when 120VAC power is hooked up, the +12VDC switches to the computer power supply. I needed switches and circuit breakers for the +12VDC as well
[image no longer available]
[image no longer available]
[image no longer available]
The +12VDC, Ground, and 2 Thermostat wires are run into the wall.
The 3/8” copper tubing is brought up into the wall and then connects to the heater(3/8” flare connection). I dressed it up with some wire loom.
[image no longer available]
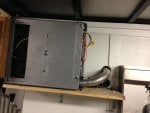
A shelf for the heater was built using ½” angled aluminum. It was mounted directly to the trailer's tubular steel frame. I mounted it as close to the ceiling so the sleds could drive underneath it.
[image no longer available]
I added extra “head” protection on the sides of the heater mounting shelf.
First and LAST time I bang my head!
[image no longer available]
Other people’s mounting ideas
![Image]()
Exhaust Mounting
I used a Suburban Exterior Vent for the exterior of the trailer. I mounted an interior plate to help with the mounting.
[image no longer available]
I bought a Suburban Furnace Heater Exterior Vent for the exhaust. The tubing is 2” exhaust tube that I bought and had bent at a local muffler shop. It has a 45 degree end and a 22 ½ degree bend because the exterior vent sits below the heater.
[image no longer available]
Thermostat
The thermostat was mounted to control the temp. The thermostat was a Suburban thermostat. 2 Wires attached. Mounted it in the front of the V.
I also added a remote override switch in the cab of the truck so I can turn on the heater when I’m driving in case I want to warm the sleds up before I arrive at my destination.
[image no longer available]
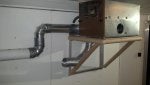
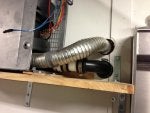
Ducting
The heater has 4” outlets on it. I just used a 4” right angle duct outlet into 4” flexible duct tubing. I also attached a 10’ Triplewall Pipe 2 Hole down the side for more airflow. I left 1 tube hanging down. I couldn’t go all the way to the floor due to the sleds needing the space.
Most RV Forced air heaters require a minimum ducting volume. This also helps draw heat away from the heater. Using ductwork, you could evenly space the heat output throughout the trailer.
See attached Pic
[image no longer available]
Heater Fresh air Intake
Update!
Add another 2" hose
I did not add an exterior fresh air intake at 1st. This was incorrect.
I now added one. I'll get pics updated sometime
Air Circulation
IMPORTANT
The key to the trailer heat is to get a fan to really move the heat around and to the floor.
I noticed a huge temp difference between the head level and floor level. 70F on top and 40-50F on the floor. A couple of feet make a big difference this is my 1st season with the 30K forced air furnace. Not insulated, but I have white panels on the ceiling. I really noticed it when it gets under 10 degrees outside. ! My feet were a little cold when working on the sled.
This last weekend I temporarily added a desk mount 12" fan. I had it head level and pointed it down on 1 side. Worked great! All the snow on the floor completely melted on only 1 side of the trailer the fan was blowing directly on. The key is to really push that air around as others mentioned. The heat rises so have to get it to the floor. This summer I'm going to install 2 12" fans on the ceiling and point them down. 1 on each side.
A drain on the floor is a good idea if you run into water pooling as lg96gt had.
I'm going to add a Fan-Tastic Vent 01100WH Endless Breeze 12V Fan. It's a compact size and looks like it really moves the air. Little pricey, $70. I actually almost bought that for my camping trips in the summertime, but I bought a RoadPro RP73002 10", the cheaper one. I'm going to permanently mount the Fan-Tastic Vent fan, and use my other Roadpro camping fan since I don't need it in the winter. The Roadpro is a decent fan and moves a decent amount for my big tent while camping. I want a little more airflow in the trailer though.
They're both 12V fans and compact. The Roadpro even has a swivel on it, so I flip it up out of the way. I have a taller trailer though so it shouldn't be an issue.
Insulation
I did not insulate my trailer. It would be really nice to do it beforehand. lg96gt recommended. Propane usage will be higher with the uninsulated trailer. More battery power consumption with the heater running more on un-insulated.
You should make sure that the alum sheet metal outside wall and the interior wood wall are sealed shut. Mine and a couple of other people’s trailers were open. lg96gt shows you how to seal it up.
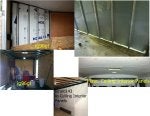
Insulation Ideas and Pics
![Image]()
On the Trucks and trailers thread, gerard143 had trouble getting his trailer really warm. I believe he has the normal white panels on the side walls, but his ceiling is open, with only the exterior roof panel and no interior white panels. My roof has the ceiling interior white panels on, so I believe that is a crucial step if you install a heater. gerard143 ended up putting insulation on the ceiling.
“After insulating the roof with 1" reflective covered foam board it helped with heat loss a ton. It will get up to 65-70 now in cold weather and once all the stuff in there warms up the furnace actually kicks off and on instead of running nonstop. I can def tell ducting lower to the floor would help with more even heat but screw it at this point. Running ducts would look ugly and shelves and etc are in the way now. Your feet can get cold though if you're in there wrenching a few hours standing on that floor.”
Insulation Info
Insulation Sheets
R5 1" x 4 x 8 FOAMULAR 250 Rigid Foam Insulation
Model Number: 270644 | Variation: Scored Square Edge
[link no longer valid]
$15.62 per sheet
2" polystyrene on the ceiling and 1" on the walls.
I would use the "blue" Window and Door Great Stuff. It expands less and thus uses less product to cover the same area and less cleanup, plus it won't bulge the wall panels if you shoot it into a hole.
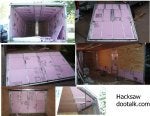
Hacksaw from Dootalk.com setup. Awesome setup.
Hacksaw dootalk Pics
![Image]()
I wanted to show my installation and provide a great deal of information to help others if they decide to do it.
I sometimes use my enclosed trailer for camping, so it was a plus to add a heater. I don’t hunt, but if I did, I would camp out in there in late fall!
It’s great for mobile repairs.
This is the first season I had this heater and it worked awesomely! I love it. Unfortunately, I had a crank bearing go out in my sled, so that really came in handy when working in negative temperatures outside.
I would recommend insulating your trailer first for the best propane usage and power consumption. Mine is uninsulated, but I have the white interior panels all the way around and the ceiling.
I currently have used 45% of my 15.4-gallon tank and on estimated 80 hours of a heater on(not running constantly though). I find that really good!
I found my heater and propane tank on Craigslist, took a while, but a great deal.
My total build investment is around:
$381 – Heater, propane tank, propane lines, anything heater install related
$220 – Electrical Install – That price also includes my 120VAC install with the duplex also. For someone doing the cheaper router, you could just add a battery and isolator relay to power.
I included my supplies list and source information.
[link no longer valid]
Everything might be considered overkill, but I love it. It new man cave as well too. The heater has come in handy.
There was a lot of talk on Heating in the Truck and Trailer thread but figured to start a new thread.
lg96gt and gerard143 and others have had good information posted there as well.
ENJOY!
Heater
I decided to go with a 30K BTU RV/camper forced air heater.
I didn’t want a catalytic heater. I also didn’t like the smell of Mr. Heaters. Those heaters also add moisture.
The RV forced air furnaces are the safest and the only way to go for heaters in a trailer. You can safely store gas cans inside and clean carbs and not worry about fire.
I mostly use the heater for repair jobs inside the trailer. My requirement was at least 30K BTU. I found a used Duo-Therm - 65930-064 30K BTU. I really wanted a Suburban or Atwood for its size, but got this for $125 locally. I’ve seen used Suburbans go for around $200-$500. I might upgrade later, but the heater kicks the heat out! Atwood and Suburban make great RV-forced air heaters.
My Duo Therm measures:
Width: 15 1/2"
Height: 14 1/4"
Length: 23"
Propane Tank Options
I had to figure out a Propane solution. I didn’t have room for an outside tank mounted in front of the V like campers are set up. My jack was in the way. I didn’t want to keep it inside just for safety reasons. I have seen people do it before but decided against it. I wanted to do a permanent mount propane tank mounted underneath the trailer in between the axles. I kept my eye open for an ASME Horizontal Permanent Mount RV propane tank.
The ASME tanks are different than the DOT (non-permanent) Horizontal Mount tanks and are more expensive. The DOT(non-permanent) Horizontal Mount in service uses a horizontal mount, but when you need to fill it, it needs to be vertical. The DOT regulation tanks cannot be mounted underneath the trailer. Only the ASME tank would fit my needs.
The Permanent ASME tanks have a Relief Valve, Vapor Service Valve, Outage Valve (Fixed Liquid Level Gauge), and 80% Stop-Fill Valve. I kept my eye out for one on Craigslist. After a while of searching, I found one for $50. I had to drive 1 ½ hrs to get it, but worth it. The tank was a 15.4-gallon tank, so plenty big. These tanks are hard to find I learned. I think my other option would be #3, mount it in the V of the trailer and enclose it in a box and vent outside.
I listed propane mounting options for others to use.
1. ASME Horizontal Permanent Mount RV propane tank
- Mounted underneath trailer in-between axles
- 15.4 Gallon tank – 3x capacity of a normal 5-gallon bbq tank
- Can be filled in this position. I got the tank filed at my local propane service shop. He just let me crawl underneath the trailer and connect the fill hose. I was going to put an acme remote filler hose to the side of the trailer, but my propane usage is great. Only got it filled once before the season and lasted all season. I have no problem crawling underneath it in the fall. Propane fill goes pretty fast too.
- Most expensive setup - $400 new, found mine used for $50 – hard to find used ones
- This setup and safety were questioned by 1 person on the Trucks and Trailers thread. Here was the info I gathered. I should have an extra diamond plate for more protection. My tank did come with a rock shield by the propane connections already.
"I talked to 6 different guys on SnoWest about the installation. That's where I got the idea. SnoWest guys have been running that setup for years like that without any issues. People also use this same propane tank on old-school VW Westy vans. It must be ASME rated though.
I like your idea of the diamond plate as a shield. Extra protection. Good thinking!"
"We all like to attempt to plan for the worst case scenario like rollovers or slide-offs. I tried a little extra protection when I mounted it behind the axle. At least if I hit something hard, the front axle should sustain the hit. That is head-on and not sideways though. With the other propane mounting options, there is still a chance of it getting damaged in an accident as well. Maybe not as much as my setup, but still a chance."
"But the shield is a good idea because if your regulator vent hole (pretty tiny) gets iced over, the reg will not work."
Other people’s ideas
2. Vertical Mount Outside in front of V of trailer
Must purchase bracket
Trailer jack might be in the way
Other people's ideas - Exterior V Mounting Tank Pic
3. Vertical Mount or Horizontal Mount in a trailer in an enclosed box with outside vents
-Must build propane mount and enclosed box with outside air vents
The propane Tank should not be exposed to the inside heating area. It should be sealed in an enclosed box and vented to the outside.
“I see some of you guys putting tanks inside...my math on this one was pretty easy on why NOT to do it. making a mount, and running an extra 20ft of copper cost me around $40. mounting it inside, possibly dying if I sleep overnight in the trailer, or a possible time bomb if for some reason escaped gas ignites cost me my life. ever seen a trailer filled with propane blow-up? there isn't a trailer anymore...(youtube) I'll take the $40 route. just my .02”
ndmtnsledder on Snowest had a great idea.
“I was able to figure out how to open up the front of the V inside and managed to squeeze a propane tank at the bottom and seal from the electric area, then a battery shelf, and above that an RV style charger converter that runs my 12v and 110v systems and a battery meter gauge”.
“I have very fine-meshed steel that the propane tank sits on but the mice can't get through and then I went around underneath all the wall cavities and sprayed an expandable foam that said it's mouse-proof. Since I've done that I have had a single sign of mice in the trailer.”
ndmtnsledder's(snowest) setup
Propane Tank Painting
I decided to repaint it before it was mounted. Wire brush and Rustoleum Clean Metals Primer & Paint. I Rubber band a plastic bag over the valve assemblies and paint away.
Before
[image no longer available]
After Wire Brush and sanding
[image no longer available]
Let the painting begin
[image no longer available]
[image no longer available]
Propane Tank Install
I mounted the propane tank underneath the trailer. It is located towards the back, behind the axles. I figured it was better protected behind the axle. The propane tank had mounted on it. I dropped carriage bolts from inside the trailer down. I put some big spacers on the bolt to keep the tank directly off the floor.
[image no longer available]
[image no longer available]
[image no longer available]
Propane Lines Install
The furnace requires a 11 w.c pressure. I picked up a 2 stage Propane Pressure Regulator and connected it to the propane tank. I used 3/8” soft copper for the short runs and ½” black iron pipe for the long runs. I used ½” steel clamps for fastening to the frame underneath. The best tubing to use is the Marine Grade Flexible LPG tubing.
See propane mounting pdf.
[image no longer available]
Heater Install
Electrical
I needed to have 8A DC available for the heater. You do not want to run this directly off your normal truck starting battery when the truck is off. You will need another battery or 120VAC power w/ 12DC transformer. I wanted 120VAC power outlets installed as well. To supply enough current and run this setup I had a couple of options. For the majority of the time, I will always be around a 120VAC outlet available(shore power). At my house, hotel parking lots, etc. I will eventually put in 2 – 6V golf cart batteries or just buy a generator for mobile locations where no power is available.
The shore power(house electric outlet to extension cord) is brought into a Marinco Marine On-Board Charger Inlet (15-Amp, 125-Volt). For the time being, I’m not running an air compressor so 15A is fine. When I do add it, I will replace the 15A Marinco inlet with a 30A hookup.
The shore power wiring then goes to a sub-panel breaker box with 3 breakers. The 3 duplex outlets are wired to the breakers for AC use.
I needed a +12VDC supply also for the heater and lights. I used a 400-watt (15A) computer power supply to power the DC loads(heater & lights, etc…) when 120VAC shore power is plugged in. The computer power supply was modified so it turns on with no load and added 8awg wires for the heavier currents. I will eventually go with a PD 9245C 45 Amp RV Converter/Charger to replace the computer power supply if I add batteries to the trailer. The computer supply was a cheap solution for the time. I added a relay so the trailer receives +12VDC from the truck when it is hooked up to the truck, but when 120VAC power is hooked up, the +12VDC switches to the computer power supply. I needed switches and circuit breakers for the +12VDC as well
[image no longer available]
[image no longer available]
[image no longer available]
The +12VDC, Ground, and 2 Thermostat wires are run into the wall.
The 3/8” copper tubing is brought up into the wall and then connects to the heater(3/8” flare connection). I dressed it up with some wire loom.
[image no longer available]
A shelf for the heater was built using ½” angled aluminum. It was mounted directly to the trailer's tubular steel frame. I mounted it as close to the ceiling so the sleds could drive underneath it.
[image no longer available]
I added extra “head” protection on the sides of the heater mounting shelf.
First and LAST time I bang my head!
[image no longer available]
Other people’s mounting ideas
Exhaust Mounting
I used a Suburban Exterior Vent for the exterior of the trailer. I mounted an interior plate to help with the mounting.
[image no longer available]
I bought a Suburban Furnace Heater Exterior Vent for the exhaust. The tubing is 2” exhaust tube that I bought and had bent at a local muffler shop. It has a 45 degree end and a 22 ½ degree bend because the exterior vent sits below the heater.
[image no longer available]
Thermostat
The thermostat was mounted to control the temp. The thermostat was a Suburban thermostat. 2 Wires attached. Mounted it in the front of the V.
I also added a remote override switch in the cab of the truck so I can turn on the heater when I’m driving in case I want to warm the sleds up before I arrive at my destination.
[image no longer available]
Ducting
The heater has 4” outlets on it. I just used a 4” right angle duct outlet into 4” flexible duct tubing. I also attached a 10’ Triplewall Pipe 2 Hole down the side for more airflow. I left 1 tube hanging down. I couldn’t go all the way to the floor due to the sleds needing the space.
Most RV Forced air heaters require a minimum ducting volume. This also helps draw heat away from the heater. Using ductwork, you could evenly space the heat output throughout the trailer.
See attached Pic
[image no longer available]
Heater Fresh air Intake
Update!
Add another 2" hose
I did not add an exterior fresh air intake at 1st. This was incorrect.
I now added one. I'll get pics updated sometime
Air Circulation
IMPORTANT
The key to the trailer heat is to get a fan to really move the heat around and to the floor.
I noticed a huge temp difference between the head level and floor level. 70F on top and 40-50F on the floor. A couple of feet make a big difference this is my 1st season with the 30K forced air furnace. Not insulated, but I have white panels on the ceiling. I really noticed it when it gets under 10 degrees outside. ! My feet were a little cold when working on the sled.
This last weekend I temporarily added a desk mount 12" fan. I had it head level and pointed it down on 1 side. Worked great! All the snow on the floor completely melted on only 1 side of the trailer the fan was blowing directly on. The key is to really push that air around as others mentioned. The heat rises so have to get it to the floor. This summer I'm going to install 2 12" fans on the ceiling and point them down. 1 on each side.
A drain on the floor is a good idea if you run into water pooling as lg96gt had.
I'm going to add a Fan-Tastic Vent 01100WH Endless Breeze 12V Fan. It's a compact size and looks like it really moves the air. Little pricey, $70. I actually almost bought that for my camping trips in the summertime, but I bought a RoadPro RP73002 10", the cheaper one. I'm going to permanently mount the Fan-Tastic Vent fan, and use my other Roadpro camping fan since I don't need it in the winter. The Roadpro is a decent fan and moves a decent amount for my big tent while camping. I want a little more airflow in the trailer though.
They're both 12V fans and compact. The Roadpro even has a swivel on it, so I flip it up out of the way. I have a taller trailer though so it shouldn't be an issue.
Insulation
I did not insulate my trailer. It would be really nice to do it beforehand. lg96gt recommended. Propane usage will be higher with the uninsulated trailer. More battery power consumption with the heater running more on un-insulated.
You should make sure that the alum sheet metal outside wall and the interior wood wall are sealed shut. Mine and a couple of other people’s trailers were open. lg96gt shows you how to seal it up.
Insulation Ideas and Pics
On the Trucks and trailers thread, gerard143 had trouble getting his trailer really warm. I believe he has the normal white panels on the side walls, but his ceiling is open, with only the exterior roof panel and no interior white panels. My roof has the ceiling interior white panels on, so I believe that is a crucial step if you install a heater. gerard143 ended up putting insulation on the ceiling.
“After insulating the roof with 1" reflective covered foam board it helped with heat loss a ton. It will get up to 65-70 now in cold weather and once all the stuff in there warms up the furnace actually kicks off and on instead of running nonstop. I can def tell ducting lower to the floor would help with more even heat but screw it at this point. Running ducts would look ugly and shelves and etc are in the way now. Your feet can get cold though if you're in there wrenching a few hours standing on that floor.”
Insulation Info
Insulation Sheets
R5 1" x 4 x 8 FOAMULAR 250 Rigid Foam Insulation
Model Number: 270644 | Variation: Scored Square Edge
[link no longer valid]
$15.62 per sheet
2" polystyrene on the ceiling and 1" on the walls.
I would use the "blue" Window and Door Great Stuff. It expands less and thus uses less product to cover the same area and less cleanup, plus it won't bulge the wall panels if you shoot it into a hole.
Hacksaw from Dootalk.com setup. Awesome setup.
Hacksaw dootalk Pics


")


