Hardcore Sledder banner

How to increase 550 fan reliability

1 reading
84K views 54 replies 23 participants last post by  mattfidaho  
#1 · (Edited)
I know this May be an old topic to do a write up for but I feel it is an important one because many of these 550s are still out there and perhaps changing hands to unsuspecting/unknowing buyers. If you recently purchased a 550 fan congratulations but bought a dud! Don't worry though you are not alone (myself included - I knew what I was getting into though), there are many of us out there and there is hope for your 550 to give you years of enjoyment and trouble free miles. You will read horror stories about your 550 and want to sell it the moment you google 550 blown motor. The purpose of this post is to help 550 owners gain reliability from their 550 by modifying it in the places and ways which polaris engineers forgot to. Some modifications are free and some will cost a few bucks but none of them will be as expensive as a new motor. I am no expert but have done much research and untilized the advice of the experts such as northstardave, to compile this list of upgrades. I am not sure how indepth people need the instructions for each step so I figured I will do a brief overview of everything and if anyone wants a step by step or more detail for any of the fixes just post your request to the thread and I will respond. Also I have read the info but don't recall exactly which 550s are the worst, but what if comes down to if you own a 550 fan you should make the changes I list. If any experts notice I missed something or have something to add or correct please feel free to add your .02. The point of this thread is a one stop for all 550 fan fixes, so please add your input. The majority of the issues with the 550 fan stems from it getting too hot resulting in burn downs, via oil issues, lean fuel issues, etc. I will do each step as a separate post so that I don't have to do all this at one time and so that my pics match up with the step. Ok let's begin at this moment I have 8 ideas for you.....

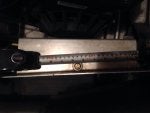
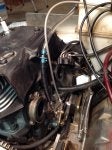
Step 1 - Exhaust Heat sheild ($ TBA )

Part number - Custom made

the fan for cooling the motor sucks the cold air in directly from the exhaust pipe (not too cool...sorry for the pun), so you need a heat sheild to lessen the temp of the air the fan grabs as well as direct the air from the inlet in the hood down to the fan more directly. As far as I know there is no part number for this part, you will have to fab it yourself or go see your local welder and they should be able to make it up pretty easy. The sheild on mine is 3/32" thick aluminum plate, it has no welds just bends, it measures 11" from front to back, and has 3 faces to it. The height of the top vertical face is 3" at the back and 3-5/8" at the front, so it does slope downwards somewhat as to gets closer to the back of the engine compartment. Te second face is horizontal and measures 2-3/4" at the front and 3-1/2" at the back. You will see in the pic that there is a mount bolt at 5-1/2" from the front edge. The lowest face is also vertical and measures 6-1/8" at the front and stays that height until about half way where it then curves up to a point that is 5" down from the top edge of this face. There are 2 bolts on this face at 4-7/8" and 9-3/4" when measured from the front edge. The bolts are approximately 3-1/8" from the top of this face. I hope some of that makes sense without a working drawing. Use the pics I am including to help you out. If it become necessary I can do up a CAD drawing but for now I want to go on with the list.
 

Attachments

#5 · (Edited)
Step 2 - Oil Bleed Kit ($60 USD)

Part number 2203889 oil bleed kit
3083671 (.006") shim kit choose one of the 3 to get proper end play
3083672 (.012") shim kit
3083673 (.024") shim kit

Sold at Polaris Parts, Yamaha Parts, OEM Parts

This is another crucial step to reliability. If I recall the overheated motor causes air bubbles to form in the oil resulting in a lack of lubrication which results in a blown motor. The kit allows you to replace the oil bleed screw with a fitting which connects to a hose which bleeds the air bubbles back into oil reservoir constantly, eliminating the lack of oil condition. This a pretty straight forward kit to install. The only difficulty I had was with 1 of the 2 Phillips screws which hold the pump to the case. The head on one stripped (as Phillips always do, hence I hate Phillips and think they are 2 worst screw design in the world - the first being slotted). So out came the Dremel and squared off 2 sides and used the old vise grips (thank goodness the kit comes with replacement bolts...not screws) After that it was a very simple straight forward install. See pic for an overview of the system. See maydaze post below for more info on the shim kit, I did not shim my oil pump and have not had an issue but I will let you decide what you will do about yours.

More to come another day.
 

Attachments

#6 · (Edited)
Step 3 - Fuel Pump Relocation ($41)

Part number - 2203890

Polaris - 2203890 - KIT-550 FUEL PUMP RELOCATE

you will want to move your fuel pump down from it factory location, because it can get air locked and create a lean fuel condition. This is a pretty simple kit to install. I found it much easier to install with the air box removed. Really there isn't much to the kit for $40USD, but it's tough to move it to the location it uses without the bracket. If you can fab up a little bracket then there is no need to buy the kit. Also I have seen some 550's where the pump has been mounted way down towards the floor of the engine compartment like the old trails in the 90's. When I bought the kit it told me to replace my factory fuel pump but northstarrick assured me the stock pump is fine. When I mounted it, I put the fuel inlet towards the top and the impulse line towards the bottom. I replaced all my fuel lines while I was at it, which required 5-6 ft of 1/4" ID hose and 8 spring clamps to install it all. Also the kit comes with a different fuel shut off valve which I found didnt work for the location of my relocation so I just reused my old shut off.

After relocation
 

Attachments

#7 · (Edited)
Step 4 - Needle Shims ($10)

Part number 7208075

Needle Shim Kit

Raising your needle another setup up is too rich for most situations, so you will use a .020" shim under each needle to raise it up half a step instead of a full step like the clip will if you adjust it. Pull out the slide from the top of the carb, remove plate holding cable in place, remove needle, place shim on the bottom side of the clip (leave clip in the 3 slot), reinstall.
 

Attachments

#8 ·
Step 5 - Up the Main Jets 1 Step

Part number depends on your current jets

Purchase at any sled/atv parts place

To eliminate the chance of a lean fuel condition even further it is important to up the size of the main jet in your carbs. I am including the jetting chart for my 2005 trail Rmk, I would think they are all the same. Google the elevation of where you do your riding, cross reference that with the temp you ride in and see the recommended jetting. Now up each of those jets by 10. For example I ride in the 0-2000ft elevation, usually in the -10F to the +10F range so the recommended jetting is 270 on the PTO (side with clutches and belt) side and 260 on the MAG side. Therefore I will install 1 size up which means 280 PTO and 270 MAG. In the pic you can see the 270 written on the main jet that is already installed.
 

Attachments

#10 ·
#11 · (Edited)
Step 6 - Open up some venting in the belly pan (cost of screen)

Part number - screen kit

Purchase screen kit at any rec supply location

To get get some extra cold air flowing around under the hood it is advised that you cut an opening in the front of the belly pan. Draw it out and grab a jig saw and hack a hole in your sled. You should cover the hole with a screen to prevent an excess of snow accumulation inside. The hole can measure 7-1/2" x 3". Then use rivets to hold the screen In place. I have heard about holes in the shock towers or something like but, need someone else to take pic to illustrate because I don't fully understand size and location.
 

Attachments

#12 ·
Step 6 - Run Premium Fuel

Part number - 91 octane

Your local gas station

Maybe it's just me but I rum premium in every small engine I own. From sleds, to quads, to snowblower, mower, tiller, etc. In the sled you will notice the extra cost but everywhere else it's so minimal that a guy may as well. The benefit of premium fuel (let's save the debate for 1 million websites and posts dedicated to the subject) is that it is more stable at higher temps and therefore less likely to cause detonation (when air fuel mixture ignites as a result of heat not the spark). A tip for you though is if you fill up at one of those multiple grade pumps that use the same hose for all grades, I always like to let them throw a couple bucks in the truck before they fill up my smaller jerry can. If you don't have premium fuel just buy some octane boost and follow the directions on the bottle.
 
#13 ·
Step 7 - Ride it like you stole it

part number - stop riding like a grandpa

Anywhere you ride

You don't have to ride it like you stole it but should try to avoid extended periods in the 25-35mph range. If you are forced to ride at this speed due to conditions, just give the throttle a blurp here and there (ie coming out of the corners and on straight aways). Make your sled work a little here and there and that will also help avoid the deaded 550 burn down.
 
#14 ·
I have a lot of experience with the 550 fan motor.

My 2005 Trail Touring that I bought used in 2006 blew with 2200 miles. Broke the piston skirt and had to replace the crank (bearings were shot). Bored it .40 over and have never had a problem with it since. It now has 9500 miles. I did put the Polaris cold air duct kit and oil bleed kit on it after my wife’s 2006 Trail Touring had a mild seizure. It’s still has the stock jetting. I finally broke down and bought a Switchback this year, but will keep this one for a backup.

In 2007 I bought my wife a brand new 2006 Trail Touring. After 2 years of riding it (1000 miles), it seized the mag piston. We let it cool down on the trail and rode it home. The cylinder was still good, so I had the cylinders honed and I put in a set of Wiseco Pistons. I had the cylinders honed to some specs I found on the Snowest Forum. I put the Polaris cold air duct kit and the oil bleed kit. It still has the stock jetting to this day. The sled has been trouble free for the last 3000 miles. I firmly believe that the oil injection pump was not working the day this sled went down. It was fired up in the trailer for the first time that year and backed out of the trailer and road about 50 miles that day. I believe it was the heat that caused the oil pump to loose its prime, but I always wondered if the oil pump had lost its prime by backing it out of the trailer.

My dad has a 2002 Super Sport (7500 miles), which has the old style muffler. I just tore it down this year for the first time to put new rings in it. Just honed the cylinders and put new rings on it.
 
#16 ·
This is really great. Thanks for taking the time to do it. I just bought an early 03 with the old style exhaust. I still want to do the oil pump update and maybe the fuel pump relocate.

Can you help me with 2 questions I have?

1. Can those two updates also be done to 03s? Same part numbers? The polaris bulletin states 04s and up.

2. What is meant by having proper end play on the oil pump. Where are you checking this? I bought the kit but no shims. Glad I saw this.

Thanks.
 
#17 · (Edited)
Steve.....try the link bellow for more info on the pump shimming. check back on the first page of my write up for who added the info regarding the pump shim and message them, I am not too familiar with the shimming part yet, as it was news to me also. As for the if part numbers carry over, Polaris shows different part numbers for my oil pump vs your oil pump. However, both pumps have the same bleed screw, so I am pretty sure the kit will work the same on yours as it did on mine.

http://www.hardcoresledder.com/foru...m/forums/252-polaris-general-discussion/474968-550-oil-pump-update-problem.html
 
#18 ·
I never have shimmed a oil pump in 27 rebuilds with the oil pump bleed kit installed. some of these sleds have over 6000 miles now with out one issue. don't really think this is needed. as if it was wouldn't that kit come with instructions and shims? a local dealer has installed a lot without shimming either. not one issue related to it. he was told by Polaris there is no need to shim the pump?
 
#20 ·
I this as much a problem on the older 550s I have a 02 bought it new for my wife, son rides it now. As he is only 11 he spends a lot of time at the 20-30 mph range. If he lets it idle for a few minutes it can bog down until you really brapp it. Sled has over 4000 miles on it never had a issue with it. I also ride with another family with 2 550s 03,and 04 4-5000 on those as well, only problem is starting or idling when hot. Any more info would be great hate spending $$ on older sled but better then big $ for a new one.
 
#22 ·
My understanding is that 02s are fine, as they are not in the Edge chassis. It is the edge chassis that changed ventilation and the problems started. I think you will be fine. 04s is when it really got going as an issue, with 03s mixed in there too. In 2003, early sleds had a smaller exhaust (single piece) and a heat shield between it and the recoil fan. In August 2002, they changed to a a much larger 2 piece exhaust, and deleted the exhaust shield. Go figure. That's really when things got crazy. At least that's my understanding.

I'm doing the oil kit on my 2003 just for some piece of mind. Oil is the blood of the engine. :thumbsup:
 
#21 ·
Thanks guys.

MachzKeith, I figured out what the deal was since I posted. Basically what I learned is the proper play allowed per the service manual. When you add the gasket, you also add play, so you need to take that out to ensure the cog or whatever you call it is in the block far enough...sounds like too, even without the bleed kit, the standard install from polaris doesn't even always meet the own spec/requirements.

From what northstarrick says, sounds like it may not even matter, but it's just one more small step (after taking a reading with a caliper) so might as well do it and be done with it.

I have my oil bleed kit in front of me. Just picked it up from the dealer yesterday. Haven't put it in yet.
 
#25 ·
Thanks for clarifying. So it must be that really in the 03 model year, when they switched around the exhaust and deleting the heat shield, that things went crazy. I hate putting out bad info hence my "my understanding..." LOL
 
#28 ·
I bought the oil tank kit, but still haven't put it in. Not sure I'm going to bother, but if not a waste of $50. I have the pre august 2002 models, with the smaller exhaust cans and heat shield, the ones before they started blowing up. Thoughts on doing it anyway? I thought about doing the fuel pump fix too, but I have the square fuel pump, and recall something different about that.
 
#31 ·
In 98, I snowchecked a 99 Trail RMK with the 550 in it. This (as I remember) was the 1st year for the 550. I was living and rinding in Colorado at the time. No issues as it had plenty of room to breath in the Gen II chassis. Gutty little engine. I adjusted the jetting and oil pump when breaking it in. It had the old ACCS altitude compensator which worked good up to around 9k'.

I sold it to a neighbor several years ago and it still running around the neighborhood and still in showroom condition. Still no issues.

.
 
#33 ·
550 fan fixes - 2012 IQ LXT

Can someone tell me if the kits that Polaris have come up with for earlier (2004 - 2008) machines are standard on the the later machines? I am referring specifically to the fuel pump relocation kit # 2203890 and the 550 oil pump bleed kit #2203889. My wife has a 2012 which burned-down at 1100 miles. We replaced the pistons, cylinders, etc. and are trying to preserve the motor. We are now using premium gas and adding a pint of injection oil to each 5 gal gas (in addition to the injection system). We are wondering if there is any point in ordering these parts if these fixes have been made to the stock machines. We know that Polaris have made attempts to improve the air flow over the motor by making changes to the intake and routing the air flow over the motor, but alas it is still not enough. I heard today of a 2016 that went down with these same oil/heat issues that have plagued these machines since 2004. Thanks.